Wednesday, November 19, 2014

Beautiful way to make and present Baked Ham

Now I got this from the television show "The Chew", and had to give it a try.

CHEW recipe called for a whole boneless precooked ham. I think I made a mistake in that because I was not cooking for a large group and did not want to spend a lot, I purchased a half of a precooked ham.  I think that the side exposed by where it was sliced, created more liquid that a whole ham would have.

So here is the idea, you are going to bake ( heat) a ham inside a bread crust.
.

You are going to need
4    hours before you plan on eating
1    boneless precooked ham
1    jar pepper jelly
1   egg
at lease enough dough for two loafs of bread

Rimmed sheet pan, parchment paper, aluminum foil

An electric knife makes slicing this for serving, much easier.

It is important to this process that you allow your ham to come to room temperature before starting. Because the ham is precooked your are just wanting to warm it and awaken all that flavor. If you start with a cold ham, your bread will be  well past done before the ham is thoroughly heated , So ham comes out of the fridge at least one hour prior.

A confession:  I purchased frozen bread dough. (this will need to thaw in the refrigerator  12 to 24 hours before you plan to start).  (about 16 hours for mine).  If you are making your own bread dough you can probably do that while your ham is coming to room temp.

Putting this together;
Preheat your oven to 350 degrees
Cover your baking dish with parchment paper.  Makes cleanup nicer as well as help moving the ham to the cutting board.
In a small bowl beat egg with a splash of water , set aside
Score the top side of your ham with a sharp knife ,
Dough should be in one peace so if using two thawed loafs, take a moment to kneed the loaves together.  Roll the dough into an oval shape , with the dough about 1/4 inch thick.
Liquefy your Pepper Jelly to make it easier to spread about.
Transfer dough to parchment paper
Spread a generous amount of pepper jelly in middle of dough (roughly the size of the ham)
Place ham on the dough
Cover top of ham in pepper jelly.
Now draw dough up over the ham, covering it fully, sealing over lapping edges with water and pinching together as needed.
Using a pastry brush cover dough with egg , coating it completely
Ham now goes into the oven .  You are going to bake this for one and a half hours.  And as we all know bread normally does not cook this long.  So, one you must understand that you are using the dough as a baking shell ( that will assist in the cooking, smell great, and will turn out to be a loved part of the meal. Your primary objective is NOT baking bread. That being said, about 30 minutes into the baking, check the bread, if it is browning too quickly, tent the ham with aluminum foil to retard browning,
Now allow the ham to rest for an hour to hour and a half.  So as you can see this would make a main dish that would easily transport to that party you need to attend.
So.
Using half a ham, I reduced cook time to one hour.
I also reduced oven temp to 325 when I tented the ham.  It did not harm anything, but I should have left it alone.  But I was mentally trying to bake bread, not cook a ham.
Changes I aim to try
My daughter Laura and I both think a rye bread dough would be a nice alternative.
I am thinking a mustard or honey mustard instead of the pepper jelly especially with the rye bread.

Saturday, November 8, 2014

Blackberry Upside Down Cake

Let be start by saying that when assembling this cake, I was sure that the cake batter was not going to adequately cover the topping.

SURPRISE

Original Recipe from Allrecipes.com and says it was submitted by PamelaP.  I initially was thinking I needed to do something to get the thick batter to better/more evenly cover the topping. Not so sure  that  is needed now.
INGREDIENTS
TOPPING                                                                                           CAKE
1/4 Cup Brown Sugar                                                                         1 Cup White Sugar
2 TBL Spoons Unsalted Butter                                                           1/2 Cup softened butter
2 Cups fresh blackberries                                                                   2 Eggs
3/4 Cup white sugar                                                                           1 1/2 Cup all purpose flour
                                                                                                           2 TSP baking powder
                                                                                                           1/2 TSP salt
                                                                                                           1/4 Cup milk 
                                                                                                           1 TSP vanilla extract
PUTTING IT TOGETHER
  1. Preheat oven to 350 degrees
  2. You will  need a 9 inch cake pan ( non-stick if you have it)
  3. Melt brown sugar and butter in saucepan, over medium heat.  Add blackberries to brown sugar mixture; cook and stir until mixture bubbles ( 1 to 3 minutes). Stir in 3/4 cup white sugar into berry mixture. Crush berries slightly while stirring, continue cooking until berries are hot and slightly broken down,  ( about 5 minutes ). Remove from heat and pour into cake pan.
  4. Beat 1 cup white sugar and the 1/2 cup butter in a bowl with electric mixer until light and fluffy
  5. Whisk together dry ingredients in a bowl.  Alternately add dry ingredients and milk beginning and ending with flour. Then mix vanilla into batter. (see no reason not to add this to butter/sugar/egg mixture)
  6. Pour batter over blackberry topping. Now I just have to interject here that this batter does not pour. Which was the cause of my initial concern.  So Spoon batter over topping and without blending batter and topping smooth together batter clumps the best you can.  Do not worry about getting all the topping covered. I did not and see the picture above.
  7. Bake in your preheated oven for 35 to 40 minutes . Allow cake to cool for up to 30 minutes. Loosen cake from sides of pan. Invert onto a plate larger that the pan,( so a 12 inch plate,  topping will drip down sides). Lift pan slowly to release cake. 

My cake fell, could be I did not let cake cool long enough.

 As a result the topping pooled in the  middle, which then soaked  the middle of the cake.  Causing the very center of a wedge of cake to be mushy, flavorful but mushy.

I am considering; trying this is a small bundt pan.  
Cooking it to the 40 minute mark ( at 35 minutes my cake passed the toothpick test )
Perhaps adding a tsp of  butter flavoring to the topping.
And I think it could use a touch of cinnamon in the topping. 

Thursday, April 3, 2014

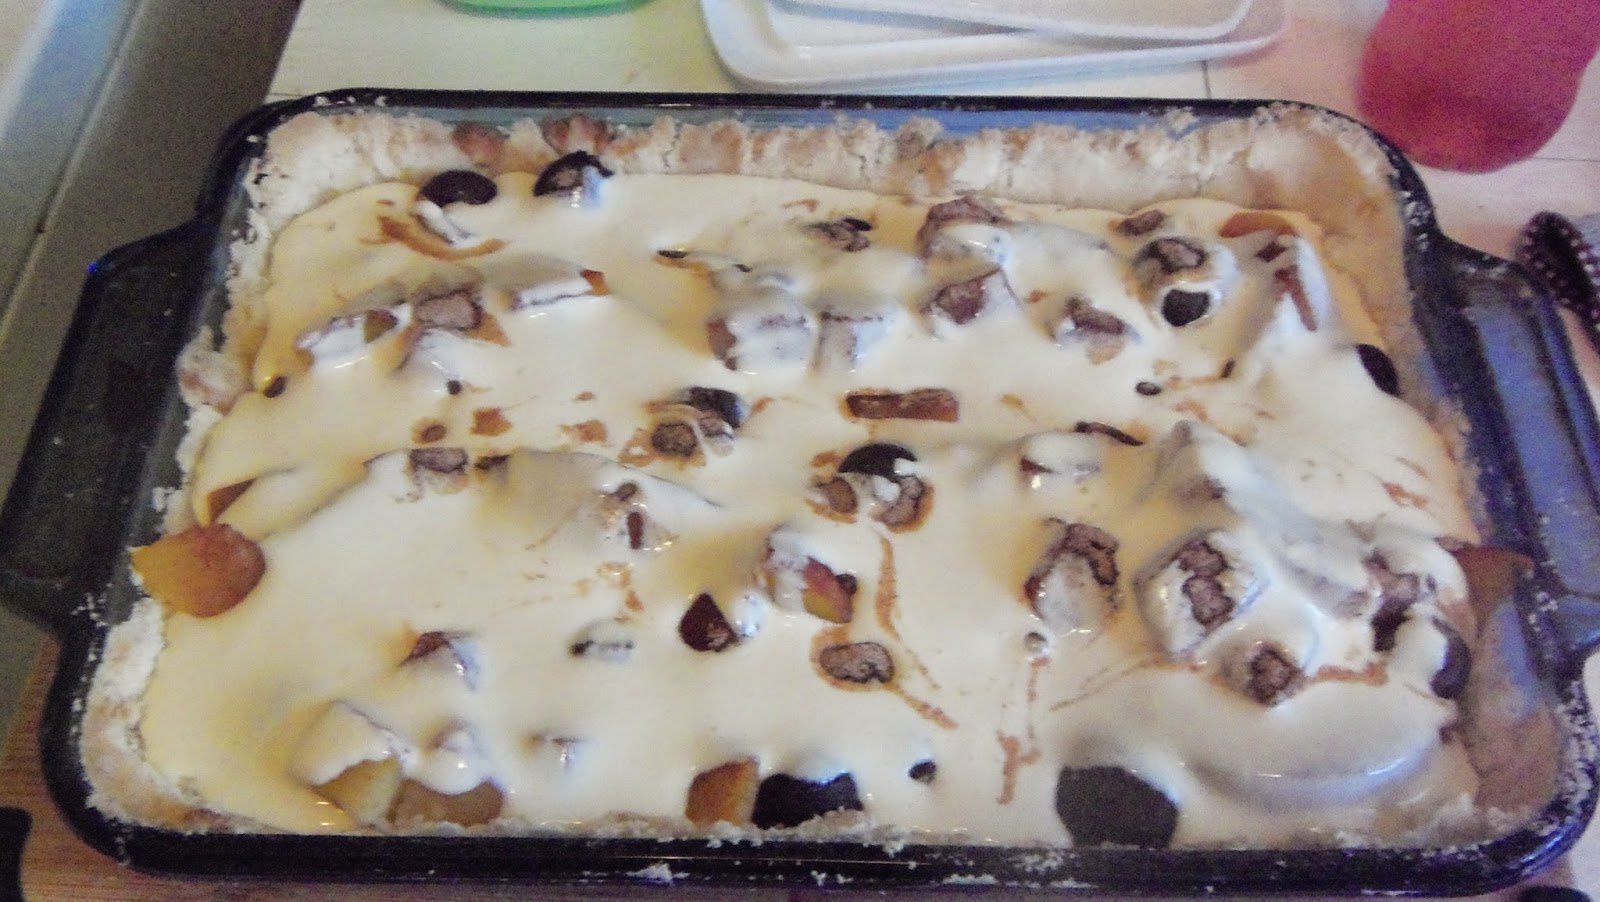
 Peach Kuchen  (if you follow the original recipe)

Time to pass along a recipe from Ruth's family

9x13 baking dish
Oven preheated to 425 degrees

Ingredients
1/2 Cup butter
2 Cups flour
1/4 tsp Baking Powder
1/2 tsp salt
1 Cup Sugar  minus 2 TBL spoon reserved for flour mixture
12 Peach halves (we prefer peach slices, we use the large 29 ounce can) Drain juice off.
1 tsp Cinnamon
2 egg yolks
1 Cup Sour Cream

CRUST
Whisk together Flour, Baking Powder, Salt and Sugar (  the 2 TBL spoons reserved)
Cut in butter until your flour mixture resembles cornmeal.'Press the resulting mixture into your baking dish using your hands, making sure to press mixture up the sides of the dish.

In THE MIDDLE
Arrange peaches in the crust.  Mix together the Cinnamon and the Cup of Sugar,  Spread this over the peaches.

BAKE
Bake in 425 degree oven for 15 minutes

TOPPING IT OFF
Whisk together the Sour Cream and the 2 Egg Yolks.  Pour this mixture over top of the peaches.
REDUCE OVEN TO 350 degrees and bake for 30 minutes.

Allow to cool at lease 30 minutes before serving, we enjoy this just as much cold from the fridg. as much warm from the oven.

NOW the above is the starting recipe, passed to Ruth by her Mom. However else I might joke about my mother-in-law, this lady knew how to cook.
After all a recipe is just a suggested starting point.
First alteration came about as I recall because we only had a small can of peaches, using what was on hand we added a can of sweet dark cherries, and then a can of chucked pineapple.  Next time around we used the large can of peaches and still added cherries and pineapple.  That gave us the amount of fruit we desired.
The final change we made was to accommodate me, I wanted more of the sour cream/egg custard topping.  So we doubled this portion of the recipe as well.

The only problem to overcome now is that there are only four corners in my baking dish.


Thursday, March 27, 2014

Drawback of reducing salt in your diet.

Went and got carryout from our favorite Chinese Restaurant, Splendid China.  Ordered our favorite meal, Crab meat Won Ton, egg roll, and Sesame Chicken.  Won Ton was great, egg roll good, I enjoy the without  Soy.  The Sesame Chicken , had a bit more garlic than we remembered and more salt than we could enjoy.

So I have to try and figure out if they changed cooks, or the cook had a bad day.  Or I have been eating less salt long enough that I may have to learn how to make Sesame  Chicken.

Wednesday, March 26, 2014

Hummingbird Cake

Believe it or not I only made two deviations from the Recipe in Cooks's Country   http://www.cookscountry.com/ Humming Bird cake recipe and it may not even qualify as a deviation.  I substituted  Coconut oil for cooking oil. and I used 10 inch pans .  The cake has been tested, bit as of this entry, not by me.  Yep I need to watch the sugar intake, does not take much sugar to make my tummy into an acid pool.

INGREDIENTS

INSTRUCTIONS

  1. 1. FOR THE CAKE: Adjust oven rack to middle position and heat oven to 350 degrees. Grease 2 light-colored 9-inch round cake pans, line with parchment paper, grease parchment, and flour pans. Drain pineapple in fine-mesh strainer set over bowl, pressing to remove juice. Pour juice into small saucepan and cook over medium heat until reduced to 1/3 cup, about 5 minutes; set aside.
    2. Whisk flour, baking powder, baking soda, cinnamon, and salt together in bowl. Whisk sugar and eggs together in separate large bowl; whisk in oil. Stir in bananas, pecans, vanilla, drained pineapple, and reduced pineapple juice. Stir in flour mixture until just combined.
    3. Divide batter evenly between prepared pans and smooth tops with rubber spatula. Bake until dark golden brown on top and toothpick inserted in center comes out clean, 50 to 55 minutes, rotating pans halfway through baking. Let cakes cool in pans on wire rack for 20 minutes. Remove cakes from pans, discarding parchment, and let cool completely on rack, about 2 hours.
    4. FOR THE FROSTING: Using stand mixer fitted with paddle, beat butter, sugar, vanilla, and salt together on low speed until smooth; continue to mix for 2 minutes, scraping down bowl as needed. Increase speed to medium-low, add cream cheese 1 piece at a time, and mix until smooth; continue to mix for 2 minutes.
    5. Place 1 cake layer on platter. Spread 2 cups frosting evenly over top, right to edge of cake. Top with second cake layer, press lightly to adhere, then spread 2 cups frosting evenly over top. Spread remaining frosting evenly over sides of cake. To smooth frosting, run edge of offset spatula around cake sides and over top. Sprinkle top of cake with pecans. Refrigerate cake for at least 1 hour before serving. (Cake can be refrigerated for up to 2 days.)
  2. Now I have to find some friends to share this cake with.

Sunday, March 23, 2014

Layered Casserole

Took inspiration from Country's Cook for a layered casserole, but reasons created by time, what was in the pantry and Ruth's inability to handle spicy.
First I started to brown a pound of ground beef I added in mushrooms, onion, salt pepper, coriander and cumin. While the beef was browning I started on the rice. They wanted Long Grain rice, which needed to be pan fried to assist in the cooking of the rice in the casserole.  I had rice in a boil bag.  Taking the hint that I did not want the rice a mushy glop.  I brought the bag of rice up to a boil and then promptly removed it from water and drained it, then scattered  in the bottom of 9x13 baking dish. I decided a few spoons of mild salsa was called for  After draining the ground beef , I layered that on top of  on top of the rice.  The recipe was calling for Rotel tomatoes, but had to be changed out to reduce heat.  Rotel was replaced by fire roasted chopped tomatoes accompanied by dices green chilies.  This I covered with a light sprinkle on grated mozzarella , this I covered with a sharp cheddar cheese.  And topped it all off with a layer of frozen corn.

baked covered at 350 degrees for 30 minutes and uncovered for an additional 10 minutes.

9x13 pan seems to create three full meals for the two of us.

Ruth has been feeling poorly for the past few days, So I am eating leftover and she is dinning on buttered noodles.


Friday, March 21, 2014

Baking tonight :  Muffins for Ruth and something new for me

Turned a crumb cake into muffins for Ruth.  Used the heat to warm the kitchen so my bread dough would rise. Yes I said I needed to warm up the house.  If you have ever visited, you either like it cold or know to wear a sweater when visiting.

Anadama Bread ( Recipe in Cook's Country, April/May 2014 edition )
I've never heard of this but the article is titled REDISCOVERING ANADAMA BREAD.
This as it turns out is a dark dense sweet bread.  I was attracted to this not just because I like to bake bread, but because it brought in two of my favorites,  corn meal and molasses.
I am about the only one I know who likes molasses.  I have it on my peanut butter sandwiches, and I like it on my pancakes.  And of the molasses flavor option I prefer the "full flavor" option.
If you are interested in the research and tinkering that went into this recipe, you will need to get a copy and read the article.
But here is the stuff you bakers need to know.

prepare two loaf pans, grease and dust with corn meal
grease a large bowl, to hold dough while it rises

1 Cup corn meal
5 1/2 Cup all-purpose flour
1Tbl spoon or 1 package instant/rapid rise yeast
2 1/2 tsp salt ( did as it called for , and may not decide to reduce salt, this taste good.)

Combine all the above in in a large bowl and whisk together.

2 Cups warm water (110 degrees)
1/2 Cup Molasses
5 TBL spoon unsalted butter MELTED

Whisk these together

Add wet ingredients to dry a bit at a time, stirring to incorporate.  ( Sorry I still do this by hand, recipe calls for new newfangled thing to mix ingredients using a dough hook.  What ever that is.)
Dough will be dense and heavy and I did have to work at it to get all the dry mixed in.
Turn dough out into the greased bowl and cover with plastic wrap. Allow dough to rise at room temperature till double in size. About and hour and a half.
Gently deflate and divide dough in half.
Pat first half into a 8x18 rectangle, and then roll the dough starting at the narrow end into your loaf. Place in bread pan, cover with plastic wrap.  Repeat process to make second loaf.  Set these aside to double in size. Again about an hour and a half.
Heat oven to 425 degrees and turn down to 375 as soon as you put the bread in.  Bake 35 to 45 minutes.  Mine was ready at 35 minutes.
Turn bread out onto wire rack and cool for 2 hours before serving.
Tasted bread unadorned, this was the end peace with all that nice crust. Tasted a slice  buttered and another with butter and honey.  This bread does not require honey.

Thursday, March 20, 2014

Potato Soup  (Note to self: find ideas for what to do with leftover potato soup)

Potato Soup requires cooking up your spuds in two way for one delicious meal. When I first started making Potato Soup I did not even look for a recipe.  It was cold outside, we were in the mood for a warming soup and Spuds were what was on hand.  So the first, was boiled potatoes cooked, drained milk added, seasoned and then coarsely mashed.   And cooked back down so what I made thickened a bit.

But time has passed and as with most meals in the kitchen I can not help but "improve".


I select enough potatoes (my preference is russets but I use what is at hand) to serve what would be a double serving of spuds to each person and one guest.  Half of these I cut up chunky for boiling.  The other half I take the time to cube up, in mouth friendly size.

Chunky potatoes go into a pot of water and I cook just as I would if I was making mash potatoes.

 While mashed potatoes are cooking I get out a 10 inch skillet, burner is turned up to medium, in goes 1 Tbl spoon of butter and 2 Tbl spoon oil.  Once the oil is heated I add two cloves of minced garlic a pinch of salt and two pinches of pepper.  The object is to flavor the oil. Then I add the cubed potatoes.  I am preparing theses as you would home fries for breakfast.  I want the cubes to brown/crisp up lightly.  Once the potatoes have browned on one side and are stirred/flipped, I dice up onion. ( And you are going to ask how much aren't you?  As much onion as you like to have in your home fries).  I also add 1 Tbl spoon dry celery seasoning and 2 Tbl spoon dried parsley.  Now I am cooking to brown the potatoes more evenly and to caramelize the onions.  Just before these are done two things need to happen, if you are adding chopped ham or already cooked and chopped bacon, you add that now.  Ham I use is already cooked, so it does not need to cook, not even heat thoroughly at this point.  Last and importantly not to be forgotten,  turn diced potato mixture out onto a paper towel lined plate and get some of that access excess oil off, then return to skillet to keep warm.

Drain water from boiling potatoes, season and mash just as you would for serving.  Now to liquefy the potatoes.  Half and half works, so does cream, I even enjoy using condensed milk.  I add and stir in milk until what I am looking at resembles a milk shake.  Now add in contents of the skillet.  At this point I add milk to thin mixture just a bit, and then I mash up and down in just one are of the pan. My objective is mash just enough to bring the fried potato taste stronger into the soup.you :do want to retain a good amount of the fried cubed potatoes.

Taste salt and pepper as needed.

NOTE TO SELF: come up with ideas to use leftover potato soup.
#1  portion out into individual baking dishes and slowly bake soup - turned out sort of like twice baked potatoes.

There are many correct variations to potato soup, test , adjust and derive at your own.  My daughter Elizabeth's potato soup is not the same as mine, but it is something I look forward to having when she is the one in the kitchen.

Another cold weather note:  You have not tasted Hot Chocolate, until your milk mixture is 1/2 milk and 1/2 condensed milk, and then chocolate flavored to your taste....found we need less chocolate syrup to reach a well loved hot drink.


Thursday, March 13, 2014

Fast Food Night.
  Seems to catch me about once a month.  Most of the time I simply do not schedule the day correctly and leave no time for meal preparation.  Here also we compromise.  We both love JOE'S CRAB SHACK located up by the ball park.  But it is a bit pricey and honestly does not qualify as fast. MACARONI GRILL and OLIVE GARDEN are reasonable close but also not fast.  PIZZA always an option for me, but Ruth not so much.  We have several burger places around, Ruth's favorite is BURGER KING, mine is not.  Again several options for chicken,  KFC would be default, her option is crispy and I am an original sort of guy.
Tonight, Macaroni Grill.  For Ruth Shrimp and Fettuccine  Alfredo, while I found an Italian Sausage in a spicy tomato sauce, we do agree on the Tiramisu .


Wednesday, March 12, 2014

 Leftover Spaghetti for dinner.

As of late Wednesday dinner, is more frequently supplied out of the love, generosity and outreach to shut-ins of our church.  Every now and then when the church is not providing Wednesday's meal, I break out the leftovers.

I have taken over the sauce making for Ruth and as is with most of my cooking there is a constant inconsistency in the results.  Rarely is what I create so far afield as to not be eatable and more and more frequently it boarders on Good.  Inconsistency has its roots in that there is no written recipe from Ruth nor one created by me .  Not only do we enjoy this meal about once a month, but I wind up making enough sauce that we have two dinners and two breakfast from it.

Me and food:  An unorganized walk through my food relationships or Honeymoon Surprise

It was a fantastic spaghetti dinner prepared by my new bride. In a cabin on lake Whitney loaned to us by my friend's in-laws.  Ruth and I were married in my friend's grandparent's house.  Friendship is great and we appreciate the way his family took us in, but he crossed the line when he invited he and his wife to share the honeymoon cabin. Because "they never had a honeymoon".  But I digress, I was talking about the meal my wife prepared for us.
Ruth had planned on cooking for the two of us, and it was not a problem for her to cook for the four of us.  It was the best spaghetti I had ever tasted.
My family cooked country,  but Italy was not a county the cooking covered.  The four of us enjoyed the meal and fortunately the cabin was large enough to provide the privacy honeymooners desire.

The surprise came the next morning, when the dinner that we had became surprisingly something new. For first breakfast Ruth made Spaghetti omelet.  I greeted this with a bit of disbelief, which thinking back on it was odd, seeing as a guy and a bachelor, I frequently raided last night's pizza from the refrigerator  for breakfast.  While I will still feign shock and dismay when I retell this story, so I can tease Ruth.  In truth, I, our daughters and even some of the granddaughters look forward to spaghetti leftovers for breakfast .


Monday, March 10, 2014

Cooking Again:  Quick and easy.... Chicken Salad.  Leftover frozen roasted chicken thawed, cut into small bite size peaces. Boiled two eggs with the pasta.  While pasta was cooking.  I diced up two TBL spoons of onion, two of the internal celery sticks complete with the leaves. sliced up about a dozen grapes.  Then I remembered the leftover crispy bacon.  This I ran through the food processor making it small enough that it became flavoring for the salad not a noticeable addition.   decided I needed a bit of bell pepper and added about 1 TBL spoon.  All of the chopped stuff I tossed in to the hot fresh drained noodles.  I diced up the two eggs and added them.  Added the chicken and three large spoons of Mayonnaise. Served with crackers.


Me and food: An Unorganized walk through my food relationships

  When I was 17 years old, my football days were finished thanks to a knee injury.  I finished playing football at 6'0" 220 pounds.  Soon the lack of constant exercise started restoring my former rolly-polly self.  
  See my entire life has been spent rolling up my jeans with a 4 inch cuff.  Getting the girth right 
meant I purchased pants for a much taller individual.  
  I was a fair skinned, red headed book worm in the land of sunshine. After you have blister a time or two and are treated with mayonnaise as a salve and vinegar in your bath. Confined to the house, smelling a lot like a salad left to wilt.  Well you just tend to sit in the shade.
  At any rate I decided I was going to diet to take of the weight, and with determination, 
starvation, lots of water, and the constant running a teen with a car does,  I lost down to 175 
pounds.
  Then Grandma and Granddad Rogers came to visit. First visit since I lost weight.  As I remember they came in on a Friday and it was Friday afternoon before I made it home to say hi. I was not greeted with the expected, "Hello. How are you?" and a hug. My Grandmother looked at me and said, "you've been sick."  The rest of the discussion about being too thin is lost in history.  But to make my point about food and my figure.....  As usual that evening I went out and returned late.  I was rousted out of bed in time to have. breakfast with the family.  And there at my place on the table was an entire pie.

Cooking again. Dinner 2/1/14. Salmon Braid 
...I was trying to recall how I made this when in Connecticut . I know the original came from a Bisquick box.. Looked online and found similar recipe but not quite as I remembered it. I also was cooking for 5 in Connecticut, so know it made a large loaf which was okay because my daughter Liz and her two girls are visiting.  Elizabeth, enjoys but does not often get to eat fish as some in her family have un-expanded and under exposed taste buds.  
Not having a recipe and no longer a user of Bisquick, plus not having canned salmon but a salmon filet, here is what I came up with.

FIRST- skin and diced Salmon filet.
 The filling, I used a large salmon filet because that was what was on hand, but previously used canned salmon. Mixture is 2 eggs, 2 Tbl spoon Ranch dressing, 1/2 tsp dill weed, 1/2 tsp dry mustard, 2 Tbl spoon diced union, 1/2 tsp pepper. 2 Tbl spoon diced bell pepper. Whisk this together and stir in diced or crumbled salmon (if canned). (SALT IS NOT NEEDED)
Needing a large enough area to contain the salmon mixture, I made a double batch of homemade biscuits.  Pat or roll out Biscuit dough into 9x18 rectangle. Transfer dough to a foil lined baking sheet , curl up sides of foil to hold any escaping salmon .  Make diagonal cuts about 1 inch wide and two inches deep along both sides. Spoon salmon mixture down middle of dough, fold dough ends in, left-right, left-right and braid sides across top.

 I preheated the oven at 425 and baked for 10 mins, then lightly covered braid with foil, reduced oven to 350 and baked for 20 min, uncovered dough , increased oven to 425 and baked till dough was biscuit brown. Remove from oven and allow to rest 15 to 20 minutes. While Salmon loaf is resting heat sauce.  Slice into serving portions, cover portions with sauce.  Sorry, but I used a store bought Alfredo sauce...I believe the original recipe used canned cream of celery or cream of mushroom soup.  After tasting this, I think I will stick with an Alfredo sauce.
After first posting this on Facebook, I have had request for the dessert recipe and my favorite biscuit recipe. I will l add both at the bottom of this entry

Now for dessert My granddaughter Emily Craig and I followed a recipe from the Cook's Country 2014 Feb/March issue for Orange Kiss-Me Cake....Made would you believe using two oranges, one of which you use all of in the cake batter.... Simply fresh and delicious. " To prevent over browning use glass or ceramic baking dish"

You are going to need a food processor larger than 4 cups or you need to be prepared to hand mix in step 4 before adding milk and eggs.

2 oranges
2 cups all purpose flour
1 1/4 tsp salt ( I reduced to 1 tsp)
1 tsp baking soda
1 cup plus 2 Tbl Spoon sugar
3/4 cup walnuts - toasted
1/4 tsp cinnamon
1 cup golden raisins
8 TBL spoons unsalted butter, softened
1 cup milk
2 large eggs

1) Adjust oven rack to middle position. Preheat oven to 350 degrees
Spray  13 x 9 baking dish with vegetable oil spay ( I greased and floured)
Grate 1/2 tsp zest from one of the oranges into small bowl.  Remove three , 2 inch long strips of zest from the same orange using a vegetable peeler, set aside.
2) Half the zested orange and squeeze juice into liquid measuring cup.  Discard spent Orange halves. Now split your second orange and squeeze juice from both halves into same measuring cup.  Remove seeds.  You should have about 2/3 cup of juice.  Set aside and hold onto the spend halves of the second orange for cake batter.
3)Whisk four, salt, baking powder together in bowl. Pulse together 1 cup sugar and walnuts in food processor until walnuts are coarsely ground.  TRANSFER 1/3 cup of this mixture into bowl with zest, add cinnamon, stir together and set aside.
4) Add raisins and the reserved spent orange halves to remaining walnut/sugar mixture in your food processor, and process until a paste forms ( about 30 seconds).  Add butter pule until combined (about 10 seconds). Add milk and eggs and process until combined (about 10 seconds) scrape sides as needed.  Add flour mixture and pulse till just combined ( about 5 pulses).
5) Pour batter into baking dish, smooth with top with rubber spatula.  Bake until toothpick inserted in center comes out clean, 30 to 35 minutes.  No time to relax , move on to step 6
6) While cake is baking, combine reserved orange zest strips, orange juice and remaining 2 TBL spoons sugar in small sauce pan.  Bring to strong simmer over medium heat, stirring occasionally, continue to cook until syrupy and reduced to about 1/4 cup liquid ( 10 to 12 minutes) discard orange zest strips.
7) Immediately after removing cake from oven, drizzle orange syrup, spreading evenly with rubber spatula.  let cake for 5 minutes, then sprinkle with walnut/zest mixture.  Let cake cool completely in dish on wire rack, about 2 hours. Serve.
MY NOTES:  I used glass baking dish, but my dish is dark in color, so the cake tended to mound in the middle.  Which of lead to the orange syrup  running to the sides of the pan and not adsorbing across the top of the cake.
My family thought poking holes in the cake with a toothpick before covering with the syrup would have been nice.  I have not tried that yet, but it is something I enjoy on several cakes.

Biscuit   I just doubled this for the Salmon braid.  From Better Homes and Gardens cookbook (Third printing 1990)
2 cups all purpose flour
1 TBL spoon baking powder
2 tsp sugar
1/2 tsp cream of tarter
1/4 tsp salt
1/2 cup butter, shortening, or  margarine (I use unsalted butter)
2/3 cup milk ( for drop biscuits increase milk to 1 cup, do not knead or roll. drop dough from TBL spoon onto greased baking sheet)

In a bowl whisk together all dry ingredients, cut in butter.  Make well in center of mixture pour in milk all at once, stir just until dough clings together .
MY NOTES:  I never got this "cut in the butter" part even close to right, until I learned about using the large side of my cheese grater to grate in cold butter.  It is less time consuming and a better process for ensuring distribution.

On a lightly floured surface and with floured hands, knead dough for 10 or 12 strokes.  Roll or pat dough into 1/2 inch thickness.  Cut biscuits to desired shape/size and bake at 450 degrees  for 10 to 12 minutes.


  Question:  Should I try and include recipes in these post?

Sunday, March 9, 2014

Jello - the making of a want to be cook

Confession time:  I love Jello, in most of its forms and most of its colors.  But even under the watchful eye of my wife, my jello will not setup.  So I have resorted to just letting it be known my love for Jello and my inability to make it.  And every once in a while a friend of Ruth's will take pity on me, and take the time to make and deliver this tasty, cool non-filing treat.

It may just be that this jello failing started my fiddling with the written formula (recipe).  After all if plain jello was never expanded upon, there would not be so many wonderful variations.
I love to cook.  Often do start with a book or magazine folded open in front of me.  But what is a person to do?  Change and adapt!  I like strong flavors and enough of a spicy kick to warm but not overwhelm.  My loving bride enjoys the light and delicate.  I have grandchildren who will not touch fish, a son-in-law who will predictably order chicken. Family members who think spaghetti sauce is something that comes in a jar and a McDonald's burger is real food. I have a granddaughter who has survived into her teens eating peanut butter sandwiches Ruth and I raised two daughters who knew where the kitchen was but not what it was for. and one daughter who fearlessly attempts to expand her families menu. She also knows the rules of change and adapt.